
Новая страница
Ниже — твой документ с встроенными скрин-плейсхолдерами в правильных местах (Action → Expected result → Screenshot). Формат уже готов для Confluence / Wiki.
Outpatient Physician Workflow: Patient Search and Consultation Management
1. Purpose of the Scenario
This scenario describes the full workflow of an outpatient physician:
- patient search
- opening the medical record
- working with consultations
- filling in and signing a consultation
2. System Login
Preconditions
- The user is authenticated under an outpatient physician account
Result
Main system workspace is displayed.
3. Patient Search
3.1 Fast Search
Action: Enter patient data in the Fast Search panel:
- Ambulatory card number
- Case number
- Last name / First name / Middle name
- Date of birth (
dd.mm.yyyy) - Document
Expected result: System displays matching patients in the results table.
Screenshot: 📷 Figure 1 — Fast Search panel with available search fields
3.2 Search Results
Action: Review the search results table.
Expected result: A list of patients is displayed with the following columns:
- Time
- Code
- Full name
- Date of birth
- Attachment
- Residential address
- Registration address
- Additional information
- Doctor
Screenshot: 📷 Figure 2 — Patient search results table with highlighted row
3.3 No Results Scenario
Action: Perform a search with no matching patients.
Expected result: System displays message:
Data not found
 Screenshot:
📷 Figure 3 — Empty search result state (Data not found message)
Screenshot:
📷 Figure 3 — Empty search result state (Data not found message)
4. Opening the Medical Record
4.1 Open Patient Record
Action: Double-click a patient row in the search results.
Expected result: Patient medical record opens.
Screenshot: 📷 Figure 4 — Medical record header with patient context
4.2 Medical Record Header
DisplayedНиже — корректировка пункта 4.2 с добавлением логики поиска и кнопки Reg.cart, сразу в RU + EN формате для вставки.
4.2 Заголовок медицинской карты / Medical Record Header
RU
В верхней части медицинской карты отображается информация о пациенте:
Также в данном блоке доступен функциональный поиск пациента по фильтрам (аналог Fast Search), позволяющий быстро переключаться между пациентами без выхода из медицинской карты.
Дополнительно доступна кнопка Reg.cart, которая открывает регистрационную карточку текущего пациента. Данный раздел описывается отдельно.
Expected result: Пользователь видит контекст текущего пациента, может выполнить поиск другого пациента или открыть регистрационную карточку.
Screenshot: 📷 Figure 5 — Medical record header with patient context, search filters and Reg.cart button
EN
The top section of the medical record displays patient information:
- Patient full name
- Date of birth and age
- Ambulatory case number
- Patient search context (Search
contextpatient / from / by)
Example:This section also includes a built-in patient search functionality with filters (similar to Fast Search), allowing quick switching between patients without leaving the medical record.
Additionally,
card. This section is described separately.
Screenshot:Expected result:
The user can view the current patient context, search for another patient, or open the registration card.
 📷 Figure 5 — Medical record header (patient identification block)
5. Medical Record Structure
Available tabs:
- Consultations
- Radiological Diagnostics
- Laboratory investigations
- Dentistry
- Referrals
- Medical history
- Visits
- Other
Screenshot: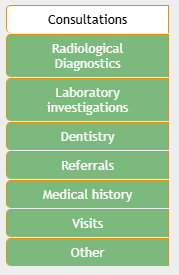
📷 Figure 6 — Medical record tab navigation panel
5.1 Tab Actions
Each tab supports:
- Create
- Create based on
- Edit
Screenshot: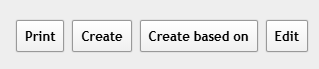
📷 Figure 7 — Tab action toolbar (Print / Create / Edit)
6. Consultations Section
6.1 Consultation List View
Action: Open Consultations tab.
Expected result: List of consultations is displayed.
Displayed fields:
- Consultation number
- Consultation date
- Payment type
- Doctor name
- Specialty
- Service name
- Visit / illness
- ICD-10 diagnosis
- Signed status
Screenshot:
📷 Figure 8 — Consultations list with multiple records
6.2 No Previous Versions Rule
System limitation:
- Only the latest version of consultation is stored
6.3 Open Consultation
Action: Double-click a consultation row.
Expected result: Consultation form opens.
Screenshot: 📷 Figure 9 — Consultation form opened (overview layout)
7. Consultation Form
7.1 General Purpose
Used for:
- filling medical data
- ordering services and referrals
- diagnosis creation
- signing consultation
7.2 Action Panel
- Save
- Save the template
- Upload a template
- Sign
- Close
Screenshot: 📷 Figure 10 — Consultation action panel (Save / Sign / Print)
7.3 Saving
Action: Click Save.
Expected result: Consultation is saved as draft.
Screenshot: 📷 Figure 11 — Saved consultation state indicator
7.4 Signing Rules
Action: Click Sign.
System rule: All mandatory fields (highlighted in yellow) must be filled.
Expected result:
- If valid → consultation is signed
- If invalid → signing is blocked
Screenshot: 📷 Figure 12 — Mandatory fields highlighted in yellow + Sign validation
7.5 Editing Rules
- Users with sufficient permissions can edit consultations
- Regular users may have read-only access
Screenshot: 📷 Figure 13 — Read-only vs editable consultation state
7.6 Clinical Sections Overview
Sections include:
- General information
- Clinical data
- Diagnosis
- Conclusion
- Statistical information
Screenshot: 📷 Figure 14 — Consultation form sections overview
7.7 Bottom Panel
Contains:
- system version
- doctor info
- specialty
- Download Manual
- Exit
Screenshot: 📷 Figure 15 — Bottom system panel with Exit button
7.8 Completing Work
Action: Save and/or sign consultation, then exit system.
Expected result: Session is safely closed.
Screenshot: 📷 Figure 16 — Exit button location in consultation form
Если хочешь, следующий шаг — я могу:
- привести это к Confluence макету (with anchors + auto-numbering)
- или сделать единый шаблон для всех модулей (Consultations / Labs / Radiology), чтобы дальше ты просто подставлял данные без переписывания структуры.